Rclone官方版1.54.0已正式支持世纪互联(含sharepoint),现在安装已经不需要啥魔改版本了。具体的rclone介绍就不多做解释了,这里就直接开始挂载。如果喜欢挂载到vps上,可以看看这个教程:宝塔面板利用rclone挂载onedrive,sharepoint到自己的vps服务器上

1、简介
目前最新版本是1.54.0,已经正常支持世纪互联(含sharepoint)!
官网:
项目:
下载:
2、windonws10安装rclone
1)Windows客户端:rclone-v1.54.0-windows-amd64.zip
2)下载后将其解压,并将rclone.exe移动到C:WindowsSystem32这个目录,这样就可以使用rclone命令了,如下截图。
查询版本命令:rclone -V,可以在cmd中查询,也可以在powershell中查询。
PS C:WINDOWSsystem32> rclone -V
rclone v1.54.0
- os/arch: /amd64
- go version: go1.15.7
3)在cmd窗口继续输入命令rclone config进行配置,输入n新建一个远程,并取一个名字,比如od
PS C:WINDOWSsystem32> rclone config

e) Edit existing remote
n) New remote
d) Delete remote
r) Rename remote
c) Copy remote
s) Set configuration password
q) Quit config
/q> n
4)输入名称后,找到OneDrive,目前最新版1.54.0,od序号是26,不是固定的,会随着版本号改变。
C:Usersdaniao>rclone config
No remotes found - make a new one
n) New remote
s) Set configuration password
q) Quit config
/q> n
name> od
Type of storage to configure.
Enter a string value. Press Enter for the default ("").
Choose a number from below, or type in your own value
 1 / 1Fichier
    "fichier"
 2 / Alias for an existing remote
    "alias"
 3 / Amazon Drive
    "amazon cloud drive"
 4 / Amazon S3 Compliant Storage Providers including AWS, Alibaba, Ceph, Digital Ocean, Dreamhost, IBM COS, Minio, and Tencent COS
    "s3"
 5 / Backblaze B2
    "b2"
 6 / Box
    "box"
 7 / Cache a remote
    "cache"
 8 / Citrix Sharefile
    "sharefile"
 9 / Compress a remote
    "compress"
10 / Dropbox
    "dropbox"
11 / /Decrypt a remote
    "crypt"
12 / Enterprise File Fabric
    "filefabric"
13 / FTP Connection
    "ftp"
14 / Google Cloud Storage (this is not Google Drive)
    "google cloud storage"
15 / Google Drive
    "drive"
16 / Google Photos
    "google photos"
17 / Hadoop distributed file system
    "hdfs"
18 / Hubic
    "hubic"
19 / In memory object storage system.
    "memory"
20 / Jottacloud
    "jottacloud"
21 / Koofr
    "koofr"
22 / Local Disk
    "local"
23 / Mail.ru Cloud
    "mailru"
24 / Mega
    "mega"
25 / Microsoft Azure Blob Storage
    "azureblob"
26 / Microsoft OneDrive
    "onedrive"
27 / OpenDrive
    "opendrive"
28 / OpenStack Swift (Rackspace Cloud Files, Memset Memstore, OVH)
    "swift"
29 / Pcloud
    "pcloud"
30 / Put.io
    "putio"
31 / QingCloud Object Storage
    "qingstor"
32 / /SFTP Connection
    "sftp"
33 / Sugarsync
    "sugarsync"
34 / Tardigrade Decentralized Cloud Storage
    "tardigrade"
35 / Transparently /split large files
    "chunker"
36 / Union merges the contents of several upstream fs
    "union"
37 / Webdav
    "webdav"
38 / Yandex Disk
    "yandex"
39 / Zoho
    "zoho"
40 /  Connection
    ""
41 /
    "premiumizeme"
42 / seafile
    "seafile"
Storage> 26  #这里选择26,其他的可以选择别的序号
** See help for onedrive backend at:  **
5)下面就需要输入Client Secret和Client Id,因为站长这里用的是同济的校友,所以需要先输入(如果你还么有,那么这之前的工作就是你要建立一个空全局,教程看这里:世纪互联空全局订阅获取Azure+自建独享API)
注意,如果是其他的可以直接略过。
OAuth Client Id
Leave blank normally.
Enter a string value. Press Enter for the default ("").
client_id> #这里填入自己的id
OAuth Client Secret
Leave blank normally.
Enter a string value. Press Enter for the default ("").
client_secret> #填入自己的secret
Choose national cloud region for OneDrive.
Enter a string value. Press Enter for the default ("global").
6)选择世纪互联和其他一堆操作。
我们看到序号4,是世纪互联,其他就跟着教程走。这里就不细说了。
Choose a number from below, or type in your own value
 1 / Microsoft Cloud Global
    "global"
 2 / Microsoft Cloud for US Government
    "us"
 3 / Microsoft Cloud Germany
    "de"
 4 / Azure and Office 365 operated by 21Vianet in China
    "cn"
region> 4  #选择4
Edit advanced config? (y/n)
y) Yes
n) No (default)
y/n> n  #这里选择n
Remote config
Make sure your Redirect URL is set to "" in your custom config.
Use auto config?
 * Say Y if not sure
 * Say N if you are working on a remote or headless machine
y) Yes (default)
n) No
y/n> y #选择y
If your browser doesn't open automatically go to the following link:
Log in and authorize rclone for access
Waiting for code...
Got code
7)这之后,会进入登录页面,输入你的账号和密码登录即可,会自动获得token,如果打不开可以把前面的网址换为:,后面的都不要动。之后的操作如下:
Choose a number from below, or type in an existing value
 1 / OneDrive Personal or Business
    "onedrive"
 2 / Root Sharepoint site
    "sharepoint"
 3 / Sharepoint site name or URL (e.g. mysite or )
    "url"
 4 / Search for a Sharepoint site
    "search"
 5 / Type in driveID (advanced)
    "driveid"
 6 / Type in SiteID (advanced)
    "siteid"
 7 / Sharepoint server-relative path (advanced, e.g. /hr)
    "path"
Your choice> 1  #这里选择1,od和sharepoint都是支持的,自己根据需要选择
Found 1 drives, please select the one you want to use:
0: OneDrive (business) id=b!5sR5nrtytytytytytytyVITcXXmJQaF8EznkrHDU
Chose drive to use:> 0  #选择0
Found drive 'root' of type 'business', URL:
Is that okay?
y) Yes (default)
n) No
y/n> y  #选择y
8)之后会出现token等配置,会自动生产配置文件,这里配置好,就算是结束了,下面的工作就是挂载,具体如下:
--------------------
[od]
type = onedrive
client_id = a58cc5
client_secret = YQ
region = cn
token = {"access_token":"eyJ0eXAiOiJKV1QiLCJub25jZSI6IjhrZ19JdUR0XzNzaklJanVlb052cFozVjlqWGp5czhRbE03Ym9WYmtkSE0iLCJ0VuE-hIAA","expiry":"2021-02-04T17:41:16.475507+08:00"}
drive_id = b!5sR5nWktPUG
drive_type = business
--------------------
y) Yes this is OK (default)
e) Edit this remote
d) Delete this remote
/d> y  #选择y
Current remotes:

Name                 Type
====                 ====
od                   onedrive

e) Edit existing remote
n) New remote
d) Delete remote
r) Rename remote
c) Copy remote
s) Set configuration password
q) Quit config
/q> q #选择q退出配置
3、挂载到本地磁盘
1)挂载之前需要下载Winfsp,没有这玩意挂载会出错。
Winfsp下载:
下载之后直接安装即可,无需修改安装位置,一路按默认的点下去就可。
2)查找配置好的配置文件可以用如下命令,rclone.conf中有你之后要用到token。
rclone config file
使用效果
C:Usersddd>rclone config file
Configuration file is stored at:
C:Usersddd.configrclonerclone.conf
3)打开cmd,输入如下挂载命令。
rclone mount / F: --cache-dir D:TempOneDrive --vfs-cache-mode writes
意思就是把od所有文件挂载到F盘符下,缓存存储在D:TempOneDrive下。这个mount后面的onedrive是你之前输入的名字,大鸟这里是od。
看到网上很多教程说需要在Git CMD中输入挂载命令,新版本之后看来不需要了这个了。直接挂载就能看到盘符。
4)挂载成功如下:
C:Usersddd>rclone mount / F: --cache-dir D:TempOneDrive --vfs-cache-mode writes
The service rclone has been started.
看看截图:
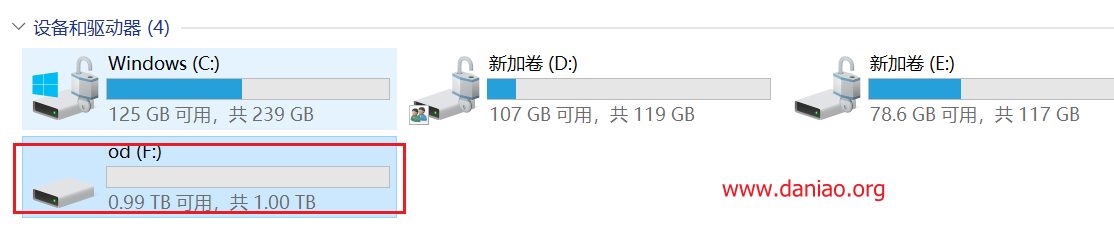
出现了盘符F。
4、开机自动挂载
到这里还没结束,电脑重启后磁盘会消失,下面看看怎么解决。
新建两个文件,分别为rclone.bat和rclone.vbs
1)rclone.bat中写入上述挂载命令:
rclone mount / F: --cache-dir D:TempOneDrive --vfs-cache-mode writes
2)rclone.vbs设置开机自动调用cmd运行rclone.bat文件并退出cmd,写入如下代码:
CreateObject("WScript.Shell").Run "cmd /c D:/rclone.bat",0
3)将rclone.bat文件放到D盘(或其他的盘)目录下,我放在了D盘,所以在rclone.vbs中该文件的路径就是D:/rclone.bat
4)将rclone.vbs文件放到windows系统启动项目录下,在文件夹的路径框中输入如下代码:即可进入启动项目录
%USERPROFILE%AppDataRoamingMicrosoftWindowsStart MenuProgramsStartup
至此,onedrive磁盘的挂载完成,且电脑下次开机时onedrive磁盘也不会消失,同理sharepoint同样的挂载方法。
5、最后
挂载后,访问速度不是太快,个人感觉没有微软官方提供的OneDrive程序打开的速度快。配置也很麻烦,其实完全可以用微软官方提供的OneDrive程序来部署。
参考资料: